Forever In Love
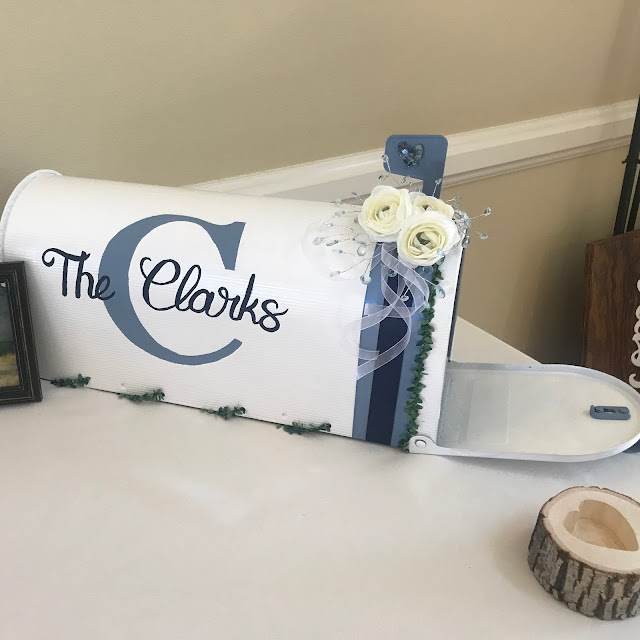
I recently got yet another opportunity to make a cardbox for an event! This time it happened to be for my best friend's wedding, and she wanted a mailbox, how cute! This craft works for really any occasion and ended up being quite simple to accomplish.
The Details:
- Price: ~ $35 (Not including mailbox)
- Time: ~ 2 hours
Materials:
- Mailbox (can be found at home depot or online)
- Paint - The colors of your event are preferable
- Ribbon - The colors of your event are preferable
- Spray Paint
- Embellishments of your choice! (I chose: crushed glass, floral crystals, flowers, & vine ribbon)


I chose my base color to be white. Her wedding colors were Dusty Blue and Navy Blue, so white seemed like a good base color. Take all the little accents off your mailbox and spray paint it. Once that is completely dry simply glue ribbon around the opening.
- Please make sure to glue the ribbon only at the bottom and around the areas where the holes for the mailbox accents are!

2. Embellish:
I chose this cute crystal embellishment I found in the floral section of Hobby Lobby. I took all the pieces apart and made a circular shape with it. I liked this bc it had the dusty blue color, added a hint of sparkle to the piece but wasn't the center of attention!


I then took this vine ribbon like stuff I found and weaved it through the holes at the bottom of the mailbox, and around the outer edge of the ribbon around the top. I liked this because my friend had greens through her wedding and as her centerpieces so it went well with the rest of the decor.


I still felt like something was missing so I simply curled some white ribbon on low heat with a curling iron and glued a few pieces to the bottom of the snowflake-like crystals. It was so simple but added a nice depth to the piece! I knew I wanted flowers in the middle, but I wasn't quite sure which one's I wanted just yet, So I left that blank, for now!


3. Customize:
I went through a lot of different ideas on how to convey a message on this. Things like "Love Mail", "Wedding Mail" "p.s. I Love You" all came to mind. But in the end I stuck simply with the newlywed's family name. I painted on a letter "C' in Serif typeface and then wrote out a smaller "The Clarks" in a brush like typeface over it.
- COMMENT: Acrylic craft paint was the worst for this, it wasn't smooth at all, my handwriting messed up a lot due to texture and bc it's quick drying it started to clump on my paintbrush. I hated it. I suggest trying something different, and if you find something smoother, please let me know!!!


Don't forget to paint the the small accent pieces that came with the mailbox and put those back on! (Again, if you find something that works better than acrylic craft paint please let me know!) I added a small crushed glass heart to my "You've got mail!" bar just because I'm extra! Lol!


Hope I was able to Inspire your next wedding craft!!
-A


.png)
Post a Comment